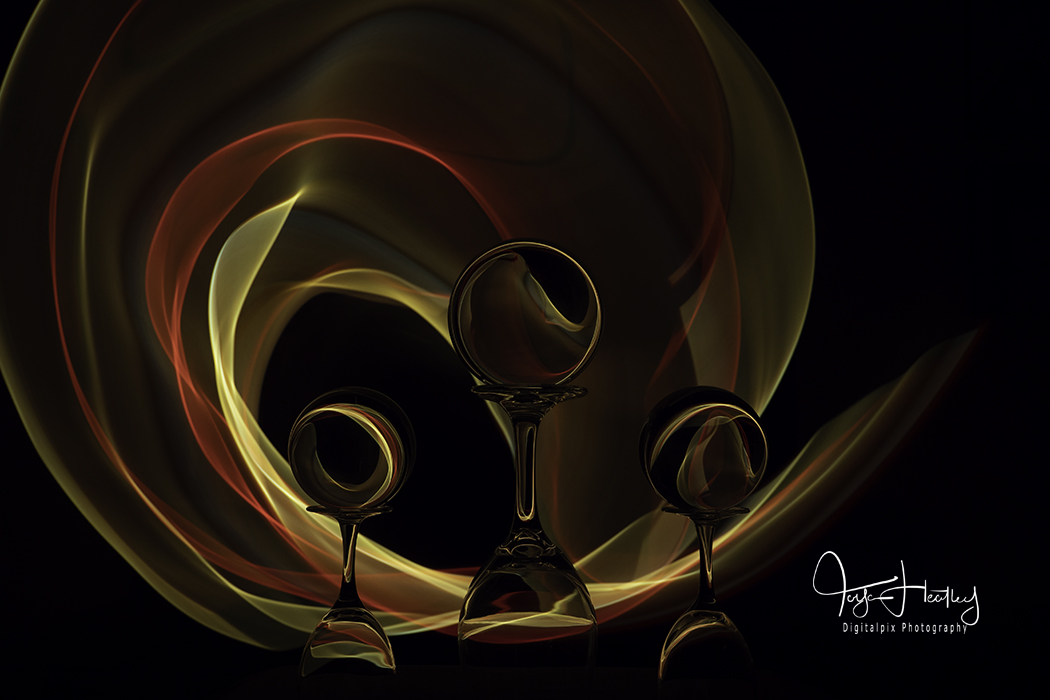
I have been asked many times about how I achieve my light painting images using the crystal balls, so today I am going to share a few of my tricks. Those who have attended my workshops will already know what lights I use but it is good to have a reference to check back on if you are wanting to find some for yourself. While I am happy to share the ‘ingredients’ and ‘recipe’ to achieving my images there is one thing that I cannot put into a tutorial. That is hours and hours of trial and error. I have deleted hundreds of images in my journey to finding a style I really like. Don’t be afraid of tossing your images and starting over – each time you will learn something new and achieve something different.

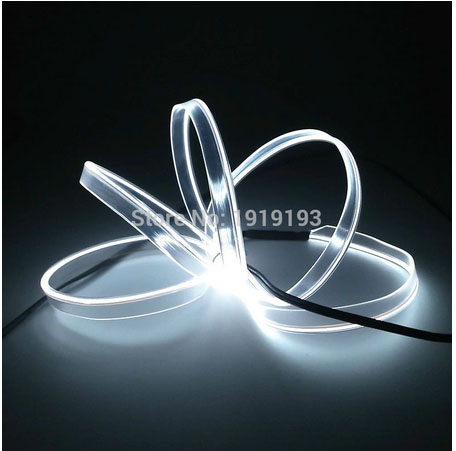
I haven’t found a good inexpensive source of led lights in New Zealand, so I tend to shop at www.aliexpress.com for all my lights now. It takes a while for them to arrive, and the quality is often questionable but I have managed a couple of shoots before some of the lights start to fail. I suspect the thin wire is not up to the stresses that I put it through with all the movement. For the images in this post I have used 2.3mm-skirt EL wire rope lights that are designed for cars. They have a flat side with the light in a rope edge. You can purchase these with or without the controllers. I recommend getting a couple with the controllers and then the rest without. The controllers are interchangeable and haven’t failed on me like the lights have. Check the prices as there are many different stores offering these lights, many of them have free shipping to NZ also.
The next items used in these images are wine glasses. Not all wine glasses are equal, you will have to test each one to ensure your crystal ball is stable on the underside of the glass base. The glasses are placed upside down and this is where you find that some glasses will have a concave for your ball to rest on, and others will not. If the crystal ball is not rock solid stable you will not have a good experience. In the dark things get knocked and you don’t want the balls crashing down and breaking. I place my wine glasses on a raised wooden chopping board covered in black cloth – I like having my workspace reasonably high.

The most important ingredient is a supportive partner who doesn’t mind when you keep asking them to do the same thing over and over but just slightly different. You can do it on your own using a remote trigger but I personally like to ‘see’ how the lights are moving before I trigger the camera. I know what I am looking for now so am able to avoid the hundreds of failed attempts. Move the lights continually but not overly fast. The soft dreamy look comes from the slow movement of the light in the dark. Darkness is important. If you can, do this in a totally dark room, but keep a torch handy for when you need to focus your camera on the balls.

The camera settings are entirely experimental. You can pretty much achieve a great image on any settings if you try. I like to use between 2 and 4 second exposures depending on the colour of the light, low ISO and I play around with the F stop. Brighter lights need less exposure time, so you can’t rely on the same settings working for all your lights. There is no hard and fast rule as to what will work and what won’t, so just play with them and have fun! Once you have your images there is more fun to be had in the processing. I like to darken the shadows, reduce the highlights if necessary and punch the colours. Don’t be afraid to crop your image if you haven’t filled the frame correctly. Have fun and be creative 🙂